Showing posts with label tips. Show all posts

Friday, March 6, 2015

Customizing a Twitter feed widget

I haven't posted here in way too long, partly because the blog had veered so far toward e-book publishing that I worried that posting about anything else was distracting. I think I just worry too much. Today I return to this blog about "pigs" (local food, buying local, etc.), "gourds" (creating beautiful things, by hand or by bits), and "wikis" (technology, ebooks, twitter, publishing, etc.) I hope you enjoy what I share here.

This post comes from a Twitter workshop series that I've been doing in Catalan over at Dra. Piula. I mean to translate it into English, but for now I may just do highlights. We'll see. But I thought this post about customizing a Twitter feed widget would interest a lot of English speakers as well. Here goes:

-----

You may already know how to create a Twitter widget for your blog or WordPress. It's not hard. You go to Settings in Twitter, click Widgets on the left, Create New on the right, and then choose criteria for the contents of the Twitter feed. Then click Create, and copy the code to your blog.

But how can you go beyond Twitter's basic search options? At first glance, it looks like you have to choose between a User timeline OR Favorites OR a List OR Search OR a Collection:

timeline_source

But what do you do if you want a user's timeline with a certain hashtag? What if you only want to someone's tweets in English? :) Or you want to see all of the tweets of a group, but only regarding a particular topic?

I'll show you.

To begin, make a normal widget using the Search option and enter the first topic that interests you into the Search Query box:
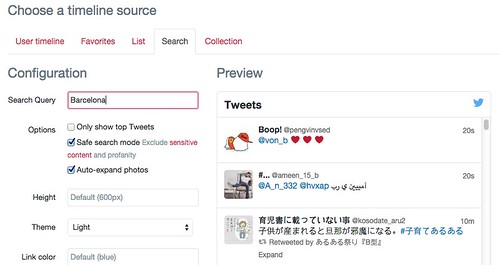
Search1

Notice that the Preview populates with all of the tweets that satisfy that criteria, which I can promise for Barcelona, means a lot of varied tweets.

Let's search only for tweets in English. Use lang:en (the two letter language code for English. And note that ca is for Catalan, but it doesn't work).
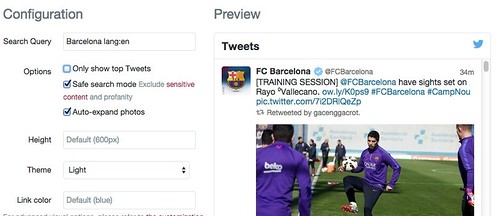
Search2

Now let's get rid of tweets that mention FCBarcelona, as much as we may love them, since they tend to block everything else out about Barcelona. Use -FCBarcelona
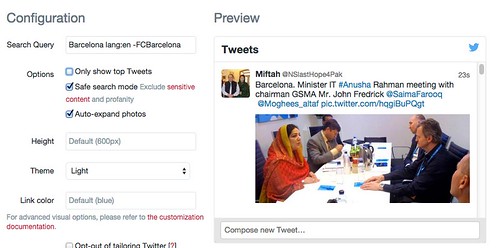
Search3

How about only tweets (and retweets) by me? Use from:lizcastro
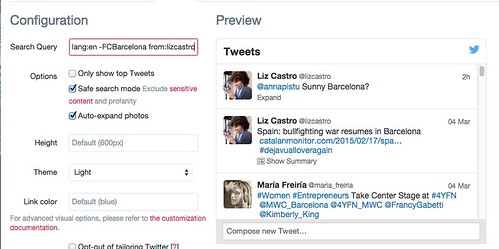
Search4

The possibilities are endless. You can precisely tailor your Twitter feed gadget to your audience, without having to limit your activity on Twitter itself.

What other criteria can we use for a search? Here's all the ones I found:
  • To search for a given word or hashtag, just list it: Barcelona, #MWC15, etc.
  • To exclude criteria from the search, use a minus sign: -beach or -from:troll
  • To find tweets in only a given language, use lang followed by the two letter code for the desired language: lang:en or lang:fr. Unfortunately, Twitter doesn't know how to distinguish tweets that are in Catalan, sometimes it thinks they're Portuguese, sometimes Romanian, sometimes Italian. And if I tell it to show me only Catalan tweets, it doesn't show any at all :( 
  • By default, RTs are included. If you don't want them, add exclude:nativeretweets
  • If you want only tweets that contain images, use filter:images
  • If you want only tweets that contain videos, use filter:videos
  • If you want only tweets that contain vines, use filter:vines
  • If you want tweets with links, use filter:links
  • If you want tweets from a given Twitter account, use from:TwitterName (no @ needed)
  • If you want only tweets from verified Twitter accounts, use filter:verified
  • If you want tweets only from the accounts belonging to a given list, use list:list owner name/list name
  • If you want only tweets who have received a given number of replies, use min_replies:n, where n is that number 
  • If you want only tweets with a certain number of favorites, type min_faves:n, where n is that number 
  • If you want only tweets with a certain number of RTs, use min_retweets:n, where n is that number
You can use AND, OR and parentheses to combine criteria:
  • If you separate each criteria with a space, Twitter concludes that you want only tweets that satisfy all the criteria. As if you typed an AND between them. So Catalan independence will get you tweets that include both Catalan and independence.
  • If you separate each criteria with an OR, Twitter will show you tweets that satisfy either one criteria or the other.
  • If you want to exclude a criteria, use the minus sign (equivalent to NOT).
  • You can use parentheses to combine criteria in various ways (Catalan OR independence) lang:en would get you all tweets in English that talk about either Catalan or the independence (so you might get Catalan books or Scottish independence, for example).
Are you thinking about all the possibilities?
  • Combine from:username and min_retweets:100 to get only the user's most popular tweets
  • Combine from:username and lang:en to get only a user's tweets in a given language
  • Combine from:username and -lang:en to get only a user's tweets that are not in English
  • Combine from:username with a search term to see only the user's tweets that are about a given topic
  • Combine list:listowner/listname and -from:username to get all of the tweets from a list, except for from one person in particular
  • And so on and so on.
To sum up, let's look at that Twitter feed we created, with tweets from me, about Barcelona, not including FCBarcelona, and only in English (on the left) compared with my standard Twitter feed on the right:
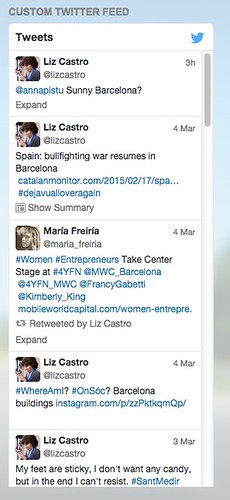
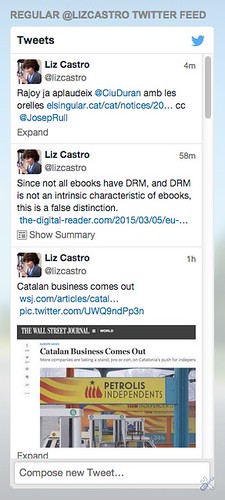
results regular_feed

Thursday, November 17, 2011

Taking Screenshots with Kindle Fire

Renumbered at 4:02pm; Updated 3:47pm, thanks to corrections made by Wangen. (The mistakes were mine, not Erica’s.) Thanks, Wangen!

I just got off the phone with Erica Sadun, geek girl extraordinaire, who had posted instructions yesterday on how to take screenshots on a Kindle Fire but who kindly walked me through the process today. I'll explain what she told me in case you too are interested.

Let me preface this with the fact that I've never used Android before today. If you, too, are new to Android, you should find everything you need in these instructions. If you already know Android, you'll probably be bored.

1First, connect your Kindle Fire to your Mac. (I don't think the process is very different on a Windows or Unix box, but to be honest, I really don't know.) 

2Next, download the Android SDK. You can find that here: http://dl.google.com/android/android-sdk_r15-macosx.zip. You don't have to install anything else besides this.

3Unzip the folder and place it wherever you would like it to be on your computer. I put mine in my Documents folder. You'll need to know the location later on in the process, so I would recommend not burying it too deeply into your folder hierarchy. The folder starts out with the name android-sdk-macosx but you can change it to something faster to type (like android). Don't change the names of the things inside that folder.

4Next, open Terminal. It should be in the Utilities folder inside the Applications folder.

5When you open a Terminal window it defaults to your home directory. You have to navigate to the android sdk folder you just downloaded. Since I put mine in my Documents directory and I changed its name to "android", I typed:

cd Documents/android

(The cd stands for change directory.) Terminal will confirm that you are now "in" that directory by changing the prompt at the beginning of the line.

6Next type this:

./android

The Android SDK Manager should appear.

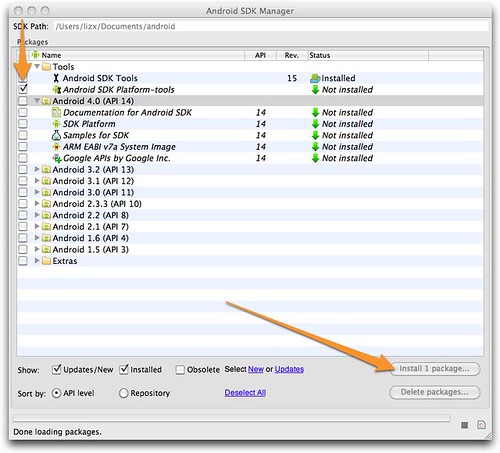
Erica told me to choose the "Android SDK Platform-tools" box and deselect everything else. Then click "Install 1 package…" at the bottom right.

Android SDK Manager

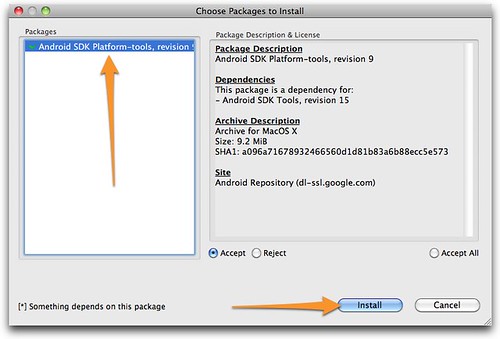
Next, you'll get the "Choose Packages to Install" window. Make sure it's the Android SDK Platform Tools in the upper left corner, and then click Install.

Choose Packages to Install

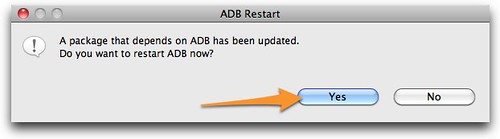
Once the package is installed, the ADB will have to be restarted. Click Yes.

ADB Restart

7Next, go back to the same window in Terminal, and create a symbolic link (a sort of alias) by typing:

ln -s ../platform-tools/adb adb

8Now, still in Terminal, to see if the Fire is connected, type

./adb devices

The output that you want looks like this:

List of devices attached
6C78000600000001    device


If you do see that, skip on ahead.

If, instead, you just see

List of devices attached

all by its lonesome—which is what I saw—we have to do a few more steps.

9First, we'll stop and restart the adb server. First type:

./adb kill-server

10And then type

./adb start-server

You should see this:

* daemon not running. starting it now on port 5037 *
* daemon started successfully *


11Now see again if your Kindle Fire device is listed, by typing

./adb devices

If it still doesn't show up, we'll edit the adb_usb.ini file.

12To do that, open a brand new Terminal window, leaving the old one open since we'll go back to it.

13As ever, Terminal starts you out in your home directory. Type:

cd .android

It turns out that this is the default location for android stuff on any Unix machine (like a Mac).

14Now type

touch adb_usb.ini

15That creates the adb_usb.ini file. Make sure you have a text editor that can save with Unix line endings like the free TextWrangler (or more powerful but not free BBEdit). Then type

open -a TextWrangler adb_usb.ini

16(Or type open -a BBEdit adb_usb.ini if you have that program.) Copy into it, the following four lines, being very careful to create a return after the last line:

# ANDROID 3RD PARTY USB VENDOR ID LIST -- DO NOT EDIT.
# USE 'android update adb' TO GENERATE.
# 1 USB VENDOR ID PER LINE.
0x1949


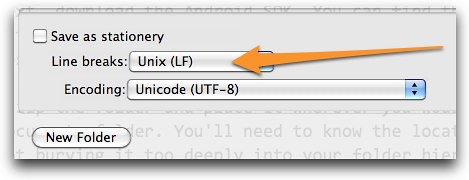
17Choose Save as and make sure that Unix (LF) is chosen in the Line breaks menu.

SaveUnixLF

18Then type

cat adb_usb.ini

in order to see your work. If you see it just as it appears above, you can continue to the next step. Unfortunately, mine appeared all jumbled on a single line (because I originally used TextEdit) and so Erica surmised that I had somehow entered the returns incorrectly and she emailed me the file. (You can download a zipped copy of that file here.

19Be sure to unzip it and place it on your Desktop before continuing as below.) I copied it to my Desktop and then from the second Terminal window, typed:

mv ~/Desktop/adb_usb.ini .

Which says "move the adb_usb.ini file from the Desktop to the current directory (represented by that final period).

Again I typed

cat adb_usb.ini

and this time, it looked like the four lines above. (Don't forget that final return after the 0x1949 line!)

OK, almost there.

Now, we go back to the first Terminal window, and for good measure, we'll stop and start the server once more. Type

./adb kill-server

And then type

./adb start-server

You should see this:

* daemon not running. starting it now on port 5037 *
* daemon started successfully *


Now see again if your Kindle Fire device is listed, by typing

./adb devices

You should really see 

List of devices attached
6C78000600000001    device


If you still don't see a device, make sure that your Kindle Fire is connected, and that the adb_usb.ini file has been correctly configured.

20The next step is to start up ddms. In the first Terminal window, type

./ddms

You should see something like

2011-11-17 13:16:02.750 java[4451:1707] [Java CocoaComponent compatibility mode]: Enabled
2011-11-17 13:16:02.751 java[4451:1707] [Java CocoaComponent compatibility mode]: Setting timeout for SWT to 0.100000


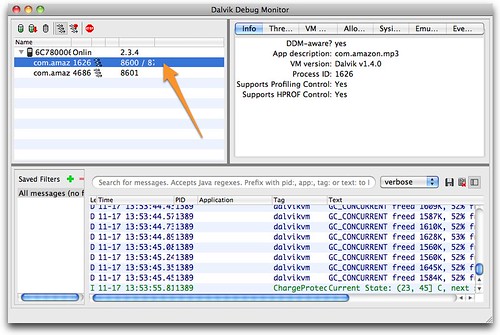
21The Dalvik Debut Monitor window will appear. You should see your Kindle Fire in the upper-left corner. Select any of the lines under your device as shown here:

Dalvik Debug Monitor

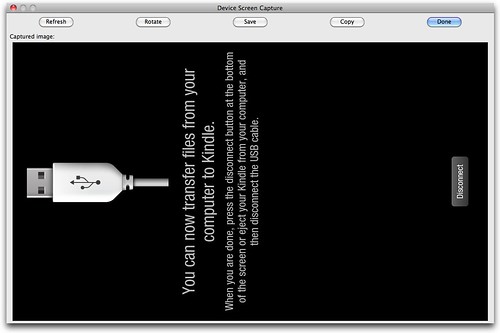
22Now to make a screenshot, press Command-S.

Device Screen Capture

The first I tried it, it came up black, because my Kindle had gone to sleep. Just wake up your Fire and then click the Refresh button. Click the Rotate button to get it to go the right way around, and then Save to create a PNG file. Here was my first screenshot (note that I added the drop shadow with Skitch):

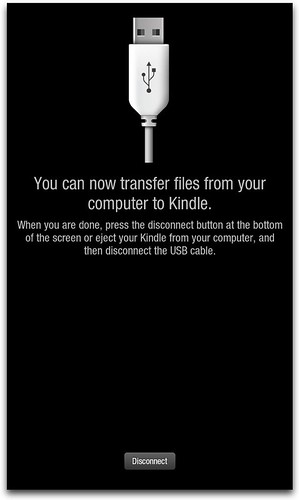
KindleFireScreenshot


To take screenshots of the Kindle in action, you'll have to dismount the Kindle from your Mac by clicking the Disconnect button.

If you've left the Device Screen Capture window open, you can hit the Refresh button to see whatever you now see on your Kindle. For example, the first few sample books that you've downloaded:


And I think that's it.


Many, many thanks to Erica Sadun, without whose help I wouldn't have known even where to start. If anyone wants to add what's different on Windows and Unix machines, please add them to the comments.

Saturday, October 30, 2010

Apple releases fix for iPhoto '11 - in the most confusing way possible

Update: On Sunday, Apple fixed the confusing headline in their support article described below. It now correctly says “Update iPhoto '11 to 9.0.1 before upgrading library”. Much better!


 Apple has just released an update for iPhoto '11, which they say “in extremely rare cases, could result in data loss when upgrading a library from an earlier version of iPhoto.”

I can't deny that the language really rankles. Frankly, I think they should be worrying more about their customers' photos that were lost and less about how it sounds. There should be a press release that alerts people to the problem and to the solution to make sure that no one else loses this very precious data.

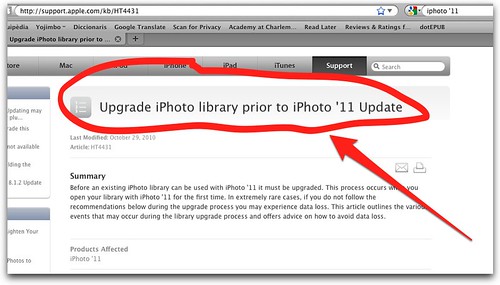
And it doesn't help that they've done it in the most confusing way possible. The headline to the support article says “Upgrade iPhoto library prior to iPhoto '11 Update”:

Upgrade iPhoto library prior to iPhoto '11 Update

But that's exactly what you should not do! Indeed, the whole rest of the article is about updating iPhoto '11 before upgrading your iPhoto Library, since upgrading your iPhoto Library with the originally shipped iPhoto '11 is what is erasing people's files.

This is made worse by the fact that they released an update called "9.0.1" for iPhoto "11". It turns out that iPhoto '11 is really version 9.0 (while the last version, iPhoto '09, was really version 8). It's confusing Marketing speak and right now it's pretty annoying. It makes you think that you should go back to iPhoto '09 and update it before installing iPhoto '11. That's not the case. To find out what version you have, choose iPhoto > About iPhoto.

The other problem is the confusion between “updating” the software (iPhoto itself) and “upgrading” your library of photos (the iPhoto Library package, of which there may be more than one, it may have some other name, and is usually found in your Pictures folder).

When you install iPhoto '11, it doesn't automatically or immediately touch your library. So, it's safe to install iPhoto '11 from the disks, then update it with Software Update or by manually downloading and installing the update. Your library will not yet be affected. You should definitely do this first, regardless of the headline of Apple's support article.

Once you open iPhoto '11, it will ask you if you want to upgrade your iPhoto Library. Here's where a lot of people (oh yeah, I forgot, extremely rare cases) had trouble. Make sure you have at least one and preferably two or more full backups of your library or libraries before proceeding. And make sure you've installed the update.

Apple says that updating your iPhoto Library can take “up to an hour or more” and that even if the program looks like it's hung, you should not force quit. Be patient. And contact AppleCare if you get stuck.

Tuesday, October 26, 2010

Wait to upgrade to iPhoto 11: Apple says fix is imminent

I just spoke to someone at Apple who called me all the way here in Barcelona to see if my data was OK and if I needed any help. I was pretty impressed. They know how important our photos are to all of us.

They confirmed that there was indeed a window during the updating process in which a force quit could “create data loss”. I asked if I would have had the same problem without force quitting and the answer was probably not, though they didn't really specify how long I would have had to wait. There are people on the Apple Discussion Forums who have let their updates go for days with no apparent signs of life. I asked if RAM could have been an issue, and they said no.

They asked me if I had any projects created with older versions of iPhoto, and I said I had two from iPhoto 5. And they asked me if I had any video playback extensions for QuickTime (I don't). They also asked how big my library was (233gb).

I asked if changing permissions of the iPhoto Library was really helpful (as someone suggested on one of my blog posts), and was told that it was only part of the solution. Deleting old projects does not seem to have any effect whatsoever.

Mostly, and this was the most important thing, they told me that a fix from Apple was imminent and that we would soon have official confirmation of same.

It's probably best to wait for the fix, but if you can't, be sure to properly BACK UP your iPhoto Library before upgrading to iPhoto 11!

DON'T RELY on Time Machine for iPhoto backup before upgrading to iPhoto 11

I got more than 6000 visits to my website yesterday from folks worried about iPhoto ERASING their iPhoto Library, like it did to mine. People are listening. Which is good. But sounding such an alarm is an enormous responsibility that I don't take lightly. I am a very long-time Apple fan and iPhoto is one of my favorite programs.

But every time I think I might be being too harsh on Apple (maybe it was just me, maybe I really could have done something besides force quit when it hung and said it wasn't responding, maybe somehow my 233gb of photos really were shoehorned into 6.5gb etc. etc.), I go to the Apple Discussion Forums and read something like this:

"Well I am one of those who didn't have backup, so thousands of pictures and videos of my kids growing up is gone."

or this

I've lost all the photos of my new son, his Christening, my family over from Australia and my dad's 70th Birthday

and this last one is pretty awful:

iPhoto libraries are not backed up by Time Machine if iPhoto is running during the back up process. I leave my iPhoto application open constantly. I bought the best MacBook Pro money could by with 8GB of RAM so I could have multiple applications open for my design work.  This is an absolute horror show for me. 

and then I'm convinced I haven't yelled enough.

First and foremost, make a BACKUP before you upgrade your software.

And DON'T RELY on Time Machine. Although Apple says it works "in the background" without you having to do anything, it doesn't. I'm afraid I've been ranting about that for a while too. If iPhoto is open (and I leave iPhoto open all the time), Time Machine will skip your iPhoto Library, even as it backs up everything else.

You will think you have a backup, and you will be wrong.

Here are the steps:

1. Close iPhoto. (Again, Time Machine will not back up an open iPhoto Library.)
2. Run Time Machine, or other backup software.
3. Make a separate, additional, independent backup of your iPhoto Library onto an external hard drive, or other media, and store it off site (in some other building). Even if you can't figure out where to take it off site, don't let that stop you from making the second copy. Just drag the iPhoto Library to an external disk.
4. Look at your backups and make sure they have the same size as your original iPhoto Library. To do so, select the iPhoto Library and choose File > Get Info.

Only then should you attempt an upgrade to iPhoto 11.

What if you've already attempted an upgrade, and had your iPhoto Library disappear?

What worked for me was starting up my computer in Safe Mode (with the Shift key down), and then rebuilding Disk Permissions (use Disk Utility, it's in your Utilities folder in the App folder), and then I started up iPhoto with Command and Option pressed down. In the dialog box that appeared, I chose the options 1, 2, and 6. It then asked if I wanted to upgrade my library, and I said yes. And it worked. It took a couple of hours (my library is 233gb) but it worked. It's really slow for me, but so far, and I'm not convinced about the interface, but it looks like my photos are intact.

If that doesn't work, I've also heard of people

eliminating duplicate fonts from the Font Book
Remove DIVX codecs from Library/QuickTime or ~/Library/QuickTime
and even removing files from within the iPhoto Library package
using disk recovery software

Of course, you can also call Apple or post your particular circumstances on the Apple Discussion Forums. There is a wealth of information there.

Good luck. And keep spreading the word:

DO NOT upgrade to iPhoto 11 without a BACKUP!!!

Monday, October 25, 2010

Installing iPhoto 11

I tried to upgrade to iPhoto 11 yesterday, only to find that my 233Gb of photos had been reduced to 6.5Gb, and that my 50,000 photos from the last ten years were gone. Completely. And I was not alone. Reading through the Apple Discussions Forum is heart-wrenching. Post after post from folks who have lost thousands and years of photos. I have done my level best to spread the word and make sure that people have a solid backup (as I thankfully did) before upgrading. If you follow me on Twitter, you're probably sick of me posting about it. But I love my own photos too much to not do everything I can so that no one else loses theirs.

And I guess I love iPhoto too much to give up on it. I thought a lot about whether I really wanted to try again. I even gave Picasa a cursory look as Farhad Manjoo recommends. In the end, I felt like all my public grousing at least demanded that I try again and see if I could find a solution. OK, and I admit it, I still wanted to see it for myself.

Thanks to the folks in the Apple Discussion Forums, I found a solution that worked for me. I restarted in Safe Mode (by holding down the Shift key as the computer starts up). Then I went to Disk Utility and repaired Disk Permissions. After copying my backup of my iPhoto Library back to my computer—which took more than two hours—I launched iPhoto with the Command and Option keys held down. In the alert that appeared, I chose options 1, 2, and 6. iPhoto then asked if I wanted to upgrade my library, to which I said yes.

And then I just waited. And waited. I even left to run an errand. Several hours later, it was done. And all the photos are there. I'll let you know if it was worth it.

But don't forget to make a BACKUP before you try it!

Sunday, October 24, 2010

WARNING!!! iPhoto 11 Erases ENTIRE iPhoto Libraries

I was very excited to hear about iPhoto 11. I'm a longtime iPhoto user, with more than 50,000 photos in my iPhoto Library that lately has grown to 233Gb. The Full Screen feature looked great, and I'm dying to see the new books feature. I wrote an entire book on iPhoto book themes and can't wait to see what's new.

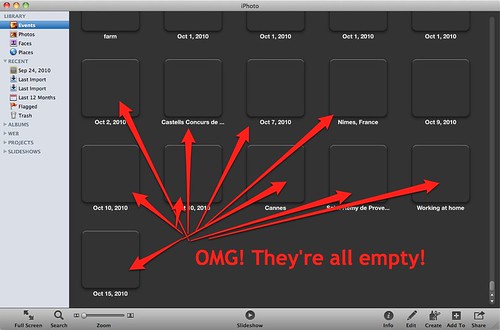
Until today. Upon upgrading to iPhoto 11, I got the revolving gray wheel for a very long time, and the Finder said that iPhoto had "stopped responding" so I force quit and started again. I was finally able to upgrade and rebuild my library, but there was nothing there. Every event was labeled properly, and contained placeholders for my images with my labels and even my ratings, but the images themselves were not there. They were all gone.

iPhoto 11 FAIL

When I went to see how big my iPhoto Library was, it said 6.3Gb. There's no earthly way my 233Gb of photos could suddenly fit into 6.3Gb. Further confirmation is that suddenly there are 230 extra GB available on my hard drive.

I would be sick (and furious) except that I backed up my library twice before attempting the upgrade. Please pass this information on to everyone you know so that no-one else loses their photos.

Apple's Discussion Forums are full of other people experiencing the same issue. Make sure you have at least one backup before attempting to upgrade. Also, if you depend on Time Machine, make sure Time Machine has been able to complete a full backup with iPhoto completely closed. Note that Time Machine will not properly back up your photos if iPhoto is open.

It's absolutely unconscionable that Apple should release software that would erase an entire iPhoto Library. We must spread the word to minimize the damage. Thanks.

As soon as I figure out how to upgrade successfully, I'll post that information here.

Thursday, September 9, 2010

Making Pages EPUBs readable in BBEdit with GREP

I keep meaning to write a full article on using GREP to edit EPUB, but until I do, at least let me share some of the tools I'm working with.

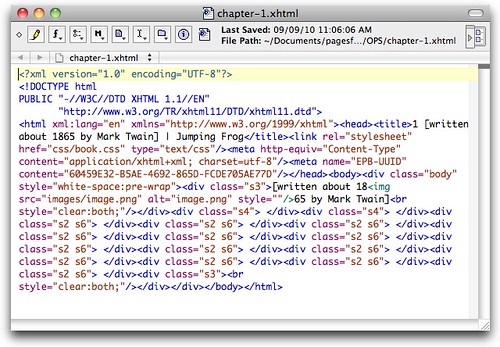
Suppose you're testing Pages, Apple's word processing software that exports to EPUB, and you want to be able to look at the code to see just how Pages translates from word processing document to XHTML. Or why on earth it stuck an image between two words in your text. Unfortunately, Apple doesn't add returns, and frankly, it's tough to slog through:

Pages EPUB before

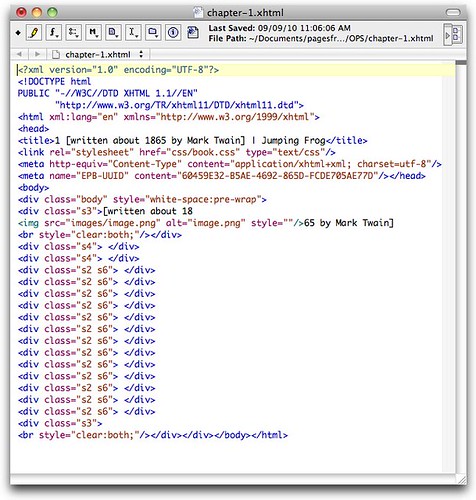
You can use GREP to add a return before each opening tag that doesn't already have one. Search for ([^\r])(<[^/]) (find a less than sign that is NOT after a return and NOT followed by a backslash) and replace it with \1\r\2 (whatever was found before the less than sign, followed by a return, followed by the less than sign and whatever followed it).

Then your XHTML will look like this:

Pages EPUB after

And you might actually be able to assess Pages' usefulness as an EPUB creation tool.

And I know I'm far from the first person to ask this, but how is it that Apple can get away with charging more than $100 for a product in Europe that in the US only costs $79 (and about $50 if you buy it on Amazon)?

Saturday, July 24, 2010

Non-English InDesign CS4 exports italic/bold as Normal


Here's another InDesign bug. Curiously it happens only in non-English versions of CS4, confirmed for now in Spanish and Italian. I tell you about it here so that you don't spend hours wondering what you're doing wrong. It's so not you!

If you have defined and applied a Character Style with Italic in InDesign and then export to EPUB, InDesign creates this CSS:

font-style: normal;

If I export that exact same file from my American version of InDesign CS4, the code comes out correctly:

font-style: italic;

The same thing happens with bold.

Of course you can edit the CSS by hand (as described in my book!), but what a hassle? And what weird thing is going on with InDesign CS4 that the localized version should act differently than the original one?

A similar, or at least related error occurs when you export an entire book from the Spanish version of InDesign CS4. The @font-face rules at the top of the CSS file all reference font-style: normal; and font-weight: normal; which results in the last @font-face rule applying its referenced font (in this case, italic) to the entire book.

@font-face {
font-family: "Adobe Garamond Pro";
font-style: normal;
font-weight: normal;
src:url(Fonts/AGaramondPro-Bold.otf);
}
@font-face {
font-family: "Adobe Garamond Pro";
font-style: normal;
font-weight: normal;
src:url(Fonts/AGaramondPro-Regular.otf);
}
@font-face {
font-family: "Adobe Garamond Pro";
font-style: normal;
font-weight: normal;
src:url(Fonts/AGaramondPro-Italic.otf);
}


Since few ereaders are even supporting embedded fonts, the best way to solve this problem is to delete all of the @font-face rules completely.

Do you have a non-English version of InDesign CS4? Please let me know if you can reproduce this bug. Thanks!

And Adobe, if you want us to take InDesign seriously as an EPUB generating tool, you have to take it seriously too. Even in your localized versions.

[And an aside. I used to localize software so that's one of the reasons I'm so intrigued with this problem.]

And thanks to Jorge Portland who brought this problem to my attention, and Letizia Sechi who confirmed its existence in the Italian version of CS4.

Tuesday, July 20, 2010

Creating an index for EPUB with InDesign and GREP

[Just happened upon Joshua Tallent's very similar technique for creating indexes in his Kindle Formatting book. For the record, I wrote this before I ever saw that section in his book. Great minds think alike! :)]

I really like indexes. I wish fiction books had them, but I believe non-fiction books MUST have them, especially mine. I'm intrigued by the possibilities for indexes with ebooks, but wasn't able to wait for the fancy stuff to be ready for my new book about EPUB. So, I created my own.

I use InDesign to prepare my EPUBs. Curiously, InDesign won't export either the TOC or the index to its EPUB file. They simply don't appear, with or without links. So, I had to get creative.

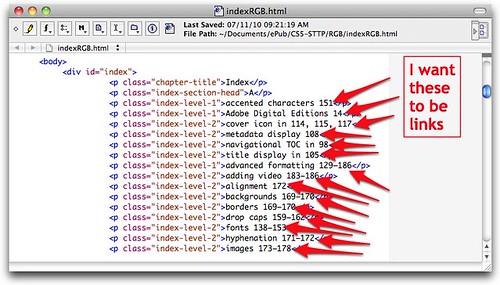
The first problem was how to get the contents of my already created index out of InDesign. If you copy the index out to a text document, you don't get any of the formatting. You can export to Dreamweaver, and it will create an XHTML document, including everything but your TOC and index.

The solution is to copy the index and paste it into a new InDesign document. Then choose File > Export for... > Dreamweaver. You'll have successfully fooled InDesign into thinking the index was just normal text and it will create a nice XHTML file for you, with properly formatted index entries.
index exported

I'll leave it up to you to add the proper CSS so that your index looks snazzy.

The real trouble is how to make the links work. There's no way to know what the pagination will be like in an EPUB document. An EPUB can be viewed on all different size screens, and your readers can change the font size and thus change the pagination, as many times as they like. Page 23 in an EPUB might be half of page 16 in the print edition one day, and all of page 30 the next!

So, how do you link the index to the referenced pages without totally recreating the index entries one by one? (Not even an index lover like me is going to do that.)

My solution was to mark the actual physical print pages in the EPUB. This has two benefits. First, if ereaders ever get around to supporting the pageList function, I'll be able to use it to relate the print edition to the EPUB edition (which could be useful in classrooms, for example, to get everyone to the same content). For the record, Apple recommends the use of pageList, though I can't see that iBooks does anything with the information, at least not yet.

My book only has 192 pages, so I decided the fastest way to mark the beginning of each physical page in the EPUB was by hand, inserting <span id="pxx"></span>, where xx is the appropriate page number. It certainly took a lot less time than creating a target for each and every index entry (which still wouldn't have solved the problem of compiling multiple references into a single entry with multiple page references).

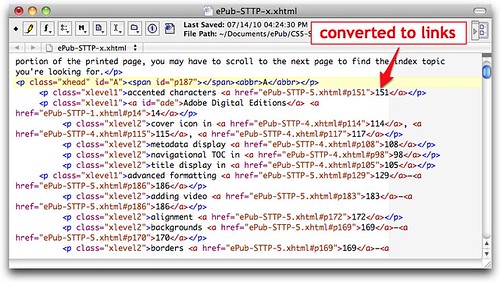
Next, I used GREP to convert my XHTML index entries into links to the now-marked pages.

The first step was to change the very few index entries that had numbers in the text itself. For example, I changed HTML5 temporarily into "HTMLfive" so that the 5 wouldn't be affected by my global changes later.

Since my EPUB has five separate XHTML files that might contain index entries, I had to use five different GREP expressions.

Here's the first one:

Search For:
( |–)(7|8|9|1[0-8])(,|</p>|–)
(Which means, search for a string that starts with a space or an en dash, followed by either a 7, 8, 9, or a 1 followed by one of 0-8, and then followed by either a comma, closing p element or an en dash. Which means, in plainer english, find me any index entry number from 7-18 (the pages in my introduction). I limited it to numbers after a space or en-dash and before a comma, closing </p>, or en dash so as to not grab two-digit numbers within three-digit ones.

Replace with:
\1<a href="ePub-STTP-1.xhtml#p\2">\2</a>\3
This Replace phrase references the three things we found in the Search phrase. The first was either a space or an en dash. The second is the page number, and the third is either a comma, closing p element or an en dash. And so we'll replace what we've found with either the space of the en dash, followed by the code for a link that references the XHTML document that contains pages 7-18 (the introduction), followed a hash symbol and the letter p, followed by the page number we found, followed by the end of the a element code, followed by the page number we found as the clickable text, followed by </a>, followed by the comma, closing p element, or en dash.

You have to run it twice because the first time it will get all the entries before an en dash and the second time it will get all the ones after it. But in my tests, it couldn't find the en dash if the search text was contained in the previous replacement text (which makes sense).

And poof, all the index entries for the introduction are done.

Now, we'll do the index entries for the first chapter, which in this example, goes from page 19 to 44.

We'll Search for:
( |–)(19|2[0-9]|3[0-9]|4[0-4])(,|</p>|–)
The only thing different here is the page numbers we're looking for. Here we want 19, or a 2 followed by 0-9 (that is all the 20's), or a 3 followed by 0-9, (the 30's), or a 4 followed by 0-4 (from 40–44).

And we'll replace it with:
\1<a href="ePub-STTP-2.xhtml#p\2">\2</a>\3
Which is the same as the first replacement text, except that this time it's the XHTML file that contains pages 19-44.

I won't bore you with the three remaining pairs of search and replaces, although I'm happy to share them if you need them.

Of course, you may need to adjust your search patterns to match your own index's formatting. And if you have cross references (see this topic, or see also that topic), you should change those into links as well.

Then I changed those few index entries that had numbers in the text (like HTMLFive) back into numbers (HTML5).

I was done with the links themselves, and all that was left was to finish off the XHTML code (the head section, closing body and html tags, etc.), and then add it to the content.opf and toc.ncx files (as described in my book).
index after

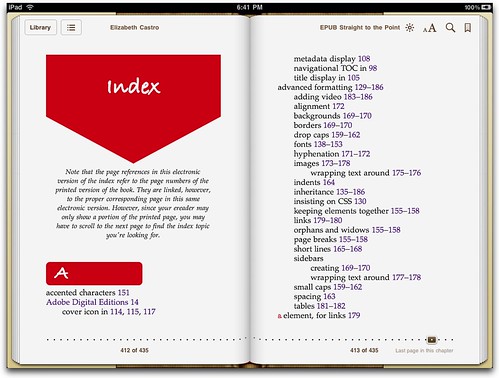
Once compiled into the EPUB it looks like this:
Index in EPUB

Find the entry you're interested, click the page number, and away you go!

This is not a perfect system. Since any ereader might divide what used to be a print page into various ereader pages, showing the beginning of the printed page may or may not include the referenced topic. The reader may have to turn an electronic page to find the topic. I added a note to the index to explain this.

Still, it's pretty good. It's lovely to be able to follow contextual index entries and find what you're looking for without having to search, say, every instance of "content.opf".

By the way, I have posted the complete index for my new EPUB book. (The links are not live on the website, since they'd have no place to go.)

Tuesday, April 13, 2010

More fonts for eBooks on iBooks on the iPad

[Update: With iBooks 1.1, Apple has changed much of the system for applying fonts. Please read Apple damaging ePub standards with pseudo-support and Apple kills fonts in iBooks, strikes blow to standards.]

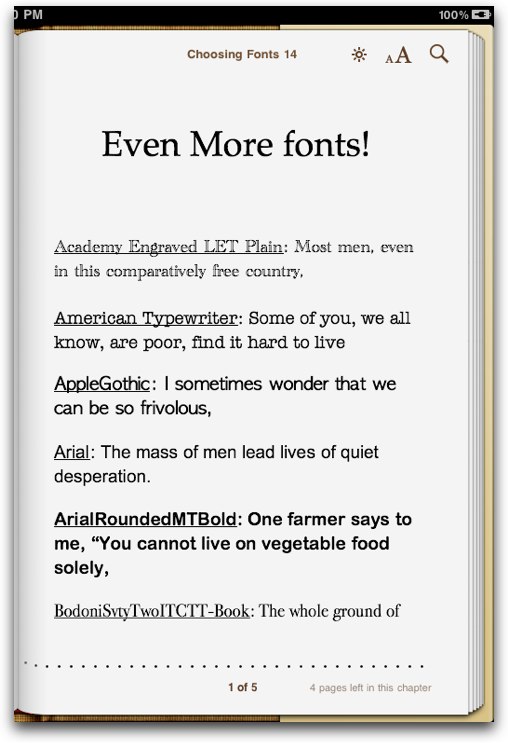
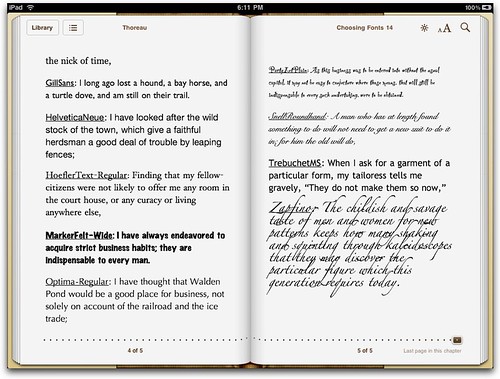
Just a few minutes ago, I wrote that there were 10 possible fonts you could use when designing eBooks to be read with iBooks on the iPad, but it turns out there are several more, 44 according to this site, with 109 font styles in all.

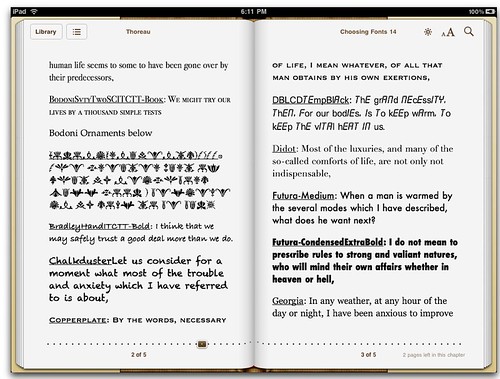
I tried them out to make sure they work in iBooks on the iPad and sure enough, they did:

More fonts for iPad eBooks 1

More fonts for iPad eBooks 2

More fonts for iPad eBooks 3

That is, most of them did. I’m not sure what I’m doing wrong with Zapf Dingbats but I can’t get it to work at all, not even in TextEdit. And I don’t have sample text for the non-Latin alphabets.

Here’s the full list. If you view this page on the iPad, you should see all the font names displayed with the corresponding font. On a desktop computer, they’ll only display correctly if you have them installed in your system—and most of them do not come standard with either the Mac or Windows OS.

Remember: many of these also have additional styles (bold, italic, etc.). I’ll see if I can get a full table up.
  • Academy Engraved LET: The quick brown fox jumps over the lazy dog.
  • American Typewriter: The quick brown fox jumps over the lazy dog.
  • AppleGothic: The quick brown fox jumps over the lazy dog.
  • Arial: The quick brown fox jumps over the lazy dog.
  • Arial Rounded MT Bold: The quick brown fox jumps over the lazy dog.
  • Baskerville: The quick brown fox jumps over the lazy dog.
  • Bodoni 72: The quick brown fox jumps over the lazy dog.
  • Bodoni 72 Oldstyle: The quick brown fox jumps over the lazy dog.
  • Bodoni 72 Smallcaps: The quick brown fox jumps over the lazy dog.
  • Bodoni Ornaments: abcdefghijklmnopqrstuvwxyz
  • Bradley Hand: The quick brown fox jumps over the lazy dog.
  • Chalkduster: The quick brown fox jumps over the lazy dog.
  • Cochin: The quick brown fox jumps over the lazy dog.
  • Copperplate: The quick brown fox jumps over the lazy dog.
  • Courier: The quick brown fox jumps over the lazy dog.
  • Courier New: The quick brown fox jumps over the lazy dog.
  • DB LCD Temp: The quick brown fox jumps over the lazy dog.
  • Didot: The quick brown fox jumps over the lazy dog.
  • Futura: The quick brown fox jumps over the lazy dog.
  • Futura Condensed Extra Bold: The quick brown fox jumps over the lazy dog.
  • Georgia: The quick brown fox jumps over the lazy dog.
  • Gill Sans: The quick brown fox jumps over the lazy dog.
  • Helvetica: The quick brown fox jumps over the lazy dog.
  • Helvetica Neue: The quick brown fox jumps over the lazy dog.
  • Hoefler Text: The quick brown fox jumps over the lazy dog.
  • Marker Felt: The quick brown fox jumps over the lazy dog.
  • Optima: The quick brown fox jumps over the lazy dog.
  • Palatino: The quick brown fox jumps over the lazy dog.
  • Papyrus: The quick brown fox jumps over the lazy dog.
  • Snell Roundhand: The quick brown fox jumps over the lazy dog.
  • Times New Roman: The quick brown fox jumps over the lazy dog.
  • Trebuchet MS: The quick brown fox jumps over the lazy dog.
  • Verdana: The quick brown fox jumps over the lazy dog.
  • Zapf Dingbats: The quick brown fox jumps over the lazy dog.
  • Zapfino: The quick brown fox jumps over the lazy dog.
There are also a number of non-Latin alphabet fonts:
  • Arial Hebrew
  • Geeza Pro (for Arabic)
  • Arial Hebrew
  • Heiti J, K, SC, and TC (for Chinese)
  • Hiragino Kaku Gothic ProN (for Japanese)
  • Hiragino Mincho ProN (for Japanese)
  • Thonburi (for Thai)
OK, can't resist. Just wanted to prove that they really do show in the iPad:
More iPad fonts


    Updating ePub tests in iBooks on iPad

    Wow. I've been doing a lot of ePub testing. I edit the XHTML and CSS. Zip an ePub. Copy it to iTunes. Hit Sync. Get bored with waiting the THREE ENDLESS MINUTESit takes to sync a tiny book file. I open the book, calculate the results of my test, go back to BBEdit and start over again.

    And that's not counting keeping track of each ePub document.

    But that wasn't enough. There must be some sort of caching going on, because even if I delete the ePub from inside the iPad and even if I delete the ePub from inside iTunes, and even if I wait those excruciatingly long 3 minutes for the thing to entirely sync up my tiny new ePub file, I wasn't seeing the changes that I had made.

    What could be the problem? Well, the problem is the title. There must be some caching going on inside iBooks, I don't know. But if you try to upload and sync an ePub with the same title as an existing one (even if you had deleted the existing one!!), it will continue to see the old one.

    The key is to change the title in the content.opf document. Then it works.

    (And, you can cancel a sync right after the ePub is copied to the iPad and save 2.5 minutes.)

    Wednesday, April 7, 2010

    Anatomy of an iBooks page

    I'm trying to figure out how exactly iBooks treats an ePub file: which formatting it preserves, and which it ignores. The fact that it ignores any at all, is incredibly short-sighted. Nevertheless, given that limitation, it seems like a good idea to at least quantify what we’re dealing with so that those who wish to design a book can have a safe idea of what it might look like, once it’s on the iPad.

    The first thing to note is that the size of a page in iBooks depends on whether you’re viewing it horizontally or vertically. If you’re viewing it vertically, there is a single page whose text area measures about 4.25" x 6"(roughly 11 x 15cm).

    Anatomy of Vertical page in iBooks on iPad

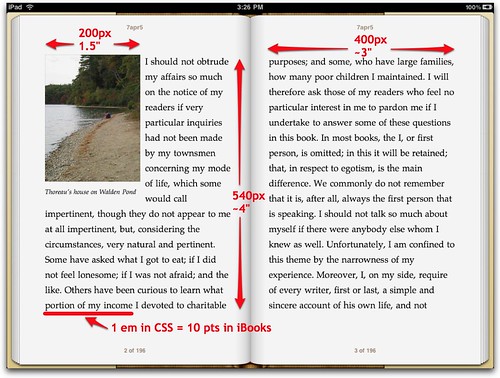
    If you’re viewing double pages horizontally, each one measures about 3" x 4" (about 7.5 x 10cm).

    Anatomy of an iBooks page on iPad-1-1

    But how big is the text? First, the resolution of the iPad screen is 132 pixels per inch. I’ve found that if your CSS specifies text of 1em, the text you get will be 10 points.

    Finally, I’ve decided that the maximum width of an illustration with wrapped text (until we can apply dynamic sizes), should be between 200 and 250 pixels, so that there’s enough space for text around the edges.

    If you’re adding a full page illustration, make sure it's no bigger than 600 x 860 pixels, or else it will be divided between pages (ew!).

    Wednesday, February 10, 2010

    The Importance of Character Encodings

    I'm amazed at how many non-supported characters I see out on the Web. I spent a long time researching and deciphering just how to use the proper character encoding so that this doesn't happen to you. You can read all about it in Chapter 21, Symbols and Non-English Characters, of my HTML, XHTML, and CSS: Visual QuickStart Book.

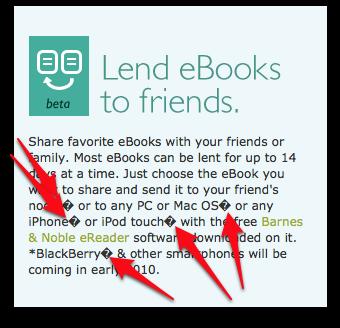
    Doing some research on Barnes and Noble's new electronic book reader, the nook, I saw this:
    Wrong Character Set on Barnes and Noble site

    Looking at the source code, you can see that B&N did not declare their character encoding. Firefox assumed it was UTF-8, but since it wasn't, the special symbols display incorrectly. If you're just a Web site visitor and want to see the page without those annoying question marks, go to View > Character Encoding, and choose a different encoding from the one Firefox tried originally. If that happens to match the character encoding that the Web site creator used, you're in luck. If not, try again until you find it.

    If you're a Web site designer, be sure and declare your page's Character Set so that browsers don't have to guess. At the top of your page, put:

    <meta http-equiv="content-type" content="text/html;charset=code" />

    where code is the character set encoding you used to write your page. I explain how to tell which one you used (and how to choose an appropriate one if you're not already), in my book!

    The Importance of Character Encodings

    I'm amazed at how many non-supported characters I see out on the Web. I spent a long time researching and deciphering just how to use the proper character encoding so that this doesn't happen to you. You can read all about it in Chapter 21, Symbols and Non-English Characters, of my HTML, XHTML, and CSS: Visual QuickStart Book.

    Doing some research on Barnes and Noble's new electronic book reader, the nook, I saw this:
    Wrong Character Set on Barnes and Noble site

    Looking at the source code, you can see that B&N did not declare their character encoding. Firefox assumed it was UTF-8, but since it wasn't, the special symbols display incorrectly. If you're just a Web site visitor and want to see the page without those annoying question marks, go to View > Character Encoding, and choose a different encoding from the one Firefox tried originally. If that happens to match the character encoding that the Web site creator used, you're in luck. If not, try again until you find it.

    If you're a Web site designer, be sure and declare your page's Character Set so that browsers don't have to guess. At the top of your page, put:

    <meta http-equiv="content-type" content="text/html;charset=code" />

    where code is the character set encoding you used to write your page. I explain how to tell which one you used (and how to choose an appropriate one if you're not already), in my book!

    Monday, February 1, 2010

    Copying a file with Command-C

    OK, before I tell you what I just discovered, I feel compelled to note that I have been using a Macintosh since 1985!

    I was watching a video tutorial this morning and the guy copied a file on the desktop by pressing Command-C and then switched to another folder and pasted it in there by pressing Command-V. Did you all know you could do that? I sure didn't. Not sure if it's useful, but it definitely took me by surprise, even though it's completely logical and obvious.

    Thought you should know too!

    Copying a file with Command-C

    OK, before I tell you what I just discovered, I feel compelled to note that I have been using a Macintosh since 1985!

    I was watching a video tutorial this morning and the guy copied a file on the desktop by pressing Command-C and then switched to another folder and pasted it in there by pressing Command-V. Did you all know you could do that? I sure didn't. Not sure if it's useful, but it definitely took me by surprise, even though it's completely logical and obvious.

    Thought you should know too!

    Wednesday, September 23, 2009

    Follow me on Twitter badge

    So, I spent way too much time wandering about looking for one of those Twitter badges that say "Follow me on Twitter". And then I looked inside the code generated by one (which was really ugly!) and all it is is a link to one's Twitter account. Hey, I can do that.

    So, if you want to add a Follow me on Twitter badge to your site, just use code something like this:

    <a href="http://www.twitter.com/TwitterAccount">Follow me on Twitter</a>

    (And if you want to add it to your Blogger blog, just go to Layout | Page Elements, and then add an HTML/JavaScript gadget. Paste the link into the Content box and you're all set.)

    Tuesday, September 15, 2009

    Formatting Blogger's Read More

    As part of Blogger's 10th anniversary celebration, they announced last week that they had added an easy Read More feature to their popular blogging software. The Read More feature (also called a jump break) lets you limit the amount of a long post that will appear on your main page, and offers a link to the rest of your post for those who want to, well, read more. The Read More feature lets your visitors see the beginnings of several different posts at once instead of having to scroll through very long posts to see what else there is.

    Using the Read More feature is really easy. First, make sure you're using the new Compose tab, as I described in Blogger's new post editor last month. Then, place your cursor in your 

    Wednesday, September 9, 2009

    Random tip: Mousing Leftward (Updated)

    Some of my most useful tips (to me anyway) come from mistyping or being clumsy on the keyboard. The other day there was something leaning on my shift key while I was using the roller on my mouse and lo and behold, I scrolled sideways instead of up and down. Cool! I'm not sure if that's mouse-specific (mine's a wireless Logitech), but I thought I'd pass it on.

    Updated!!
    Hmm. It looks like the left-right mouse scrolling is at least application dependent. In Firefox, Shift makes the mouse scroll wheel go left and right (instead of the default up and down), but in InDesign CS4, the Shift key super-charges the scrolling wheel so you scroll faster, but still up and down. The Option key plus mouse scroll zooms in and out, and the Command key finally makes the mouse wheel scroll left and right. I can't find a place where you can change these mappings.

    More of my books